
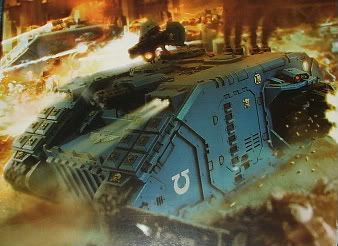
The tactic being discussed involves a Land Raider Crusader with a strong HQ, Elites, or Troops choice embarked inside. The whole idea is to drive that behemoth of death at the enemy line, hopefully at either an important objective or an equally valuable unit that must be destroyed or incapacitated. I will discuss some of the pros and cons of this strategy, as well as some other important notes to take in mind while using it.
Pros- The Crusader is AV14 all the way around, making it one of the most armoured vehicles in the game. The survivability of such a vehicle is very high, but everyone knows that the dice can make anything happen at any time, so dont expect it to always survive the whole game. It has a massive payload of firepower, and the ability to move up to 12" in a single move and power of the machine spirit one of your weapons. This tactic is definitely disheartening to see being utilized when your on the other side of the battlefield seeing that monster coming barreling at your line. This kind of tactic is great, especially when there is a lack of target priority, and all you want to do is get to an enemy position as quickly as possible. Being able to disembark out of the vehicle after moving 12" and still charging out of the disembark move is quite masterfull if pulled off correctly. I believe that this tactic needs to be used very early in the game, as a giant tank worth anywhere from 250-600points (depending also on the unit inside) will draw much fire, so dont think you will be able to deploy this tactic in turn 4 or 5. Also make sure that the unit you are going to attack is worth at least a third of the points being used to kill it. It needs to be something of high importance whether kill points or objective wise, and should be worthy of devoting half of your army to the cause.
Another added bonus of this specific strategy is that the Crusader is loaded with Frag Assault Launchers, which effectively gives the unit assaulting out the advantage of being able to charge into cover without taking the initiative penalty. Dont be timid with this tactic, and dont use this to take out a non essential unit unless the specific game target priority makes an exception. If your army is big enough where you can devote this unit and those inside to a minor unit or objective, just make sure you have enough firepower or manpower to deal with the rest of the enemy's army. I like this strategy very well, but there are some definite disadvantages to it as well.
Cons-Lets start by saying that this crusader can be a "moving coffin", and not because its nice and shiny and quite expensive to buy. While the survivability of such a vehicle is quite substantial, it still only takes a couple of good roles of the dice to make it a bunch of rubble, and force your nice expensive unit to jump out and risk getting hurt buy the explosion and the onslaught of fire that will be getting thrown at it. The phrase "putting all of your eggs in one basket" comes to mind, especially if your army is a small, elite force that devotes a huge portion of your points to the unit inside the Crusader, and the vehicle itself. The vehicle will undoubtedly draw an immense amount of fire from most armies, and from a player who knows what kind of carnage can come from the Crusader getting too close. Deploying this vehicle can be tricky, especially if the other player gets first turn, knowing that no matter where it goes, its gonna get shot at.
The Crusader is a versatile weapon within 24", but outside of that range, it is utterly useless. This vehicle needs to get close to the enemy quickly, and any army that keeps this vehicle at a distance will eventually make sure it doesnt complete its mission. An army that respects the Crusader and devotes the amount of resources to its demise will make sure that it doesnt see the 2nd or 3rd turn. The Crusader almost needs to have something else on the table that will force your opponent to divide its shots, especially something with a long range capability that can hurt the enemy's forces on the first turn. Another likely disadvantage of this strategy centers around deployment, making the positioning of this vehicle quite important. This vehicle needs to be in position to do something vital in the game, not just to one unit, but to multiple units, just in case the opponent tries to "bait and switch" the land raider to leave it out of the game either on the flanks or dead in the middle of the battlefield. An experienced player will know that something as powerful with only 24" range needs to be placed close enough to get to the enemy quickly, especially if your deploying first, while still remembering that they may steal the initiative. If deploying second, take indto consideration that most weapons fire within 24", and that you may not want the Crusader as close as normal, just to avoid taking a strong onslought right out of the gate.
While being a very expensive transport for a potentially expensive unit inside, if used wisely, it can turn the tide of any battle and make for one awesome game. Regardless of the pros and cons, this vehicle demands the attention of the enemy. It forces your opponent to devote points to stopping the behemoth, before its too late. It is something that cannot be neglected, and depending on deployment and target priority, it can be a brutal way to deliver a powerful unit into the heart of an objective or enemy unit, and have enough firepower to back up the charging unit. Caution should still be used, becuase one must never forget that a simple lascannon, melta, or lance shot can change the whole game if your not prepared to have a back up plan just in case your Crusader goes "Boom". Either way, regardless of the outcome, as long as it makes for one great story and an epic battle, thats all that matters. Have fun, and we'll do more talkin later.
The biggest downside of a Land Raider Death Star is that you can block it easily. A Hellhound or fast skimmer is ideal, but any empty transport will do.
ReplyDeleteHere's an insane example:
http://theback40k.blogspot.com/2010/05/how-i-won-battle-without-killing.html
It's gotten to the point that when I see Land Raiders on the table, I giggle inside. :)